Installation and electrical connection
Connect a maximum of 600 Watt LED lamps or compact fluorescent lamps per 16 ampere circuit breaker. Connected load and dimming quality are dependent on the type of lamp and installation conditions for LED lamps. The maximum brightness can be reduced depending on the lamp type. The operation with neutral conductor reduces this effect and the possibility of unsuitable combinations of dimmers and LED lamps.
Touch dimmer 1710 DE
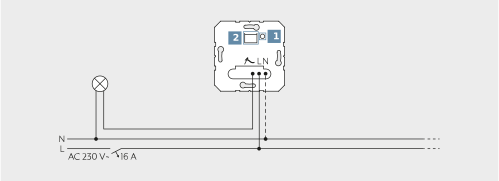
(1) Dimming mode button |
(2) Display LED and connection socket for cover |
Touch dimmer 1710 DE
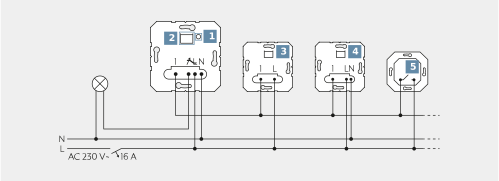
(1) Dimming mode button |
(2) Display LED and connection socket for cover |
(3) 2-wire satellite unit |
(4) 3-wire satellite unit/rotary dimmer extension |
(5) Push-button, normally open contact |
Clampable conductor cross sections | LED signalling | ||
|---|---|---|---|
| 1 x 0.5 ... 4 mm² | LED colour | Dimming mode |
2 x 0.5 ... 2.5 mm² | GN (green) | R, L, C, LED | |
| 1 x 0.5 ... 4 mm² | RD (red) | LED trailing edge phase control |
2 x 0.5 ... 2.5 mm² | BU (blue) |
| |
| 1 x 0.5 ... 4 mm² |
|
|
2 x 0.5 ... 1.5 mm² |
|
| |


Requirement: load is switched off.
- Press the dimming mode button (1) until the LED (2) lights.
- Press the dimming mode button (1) briefly as often as needed until the required operating mode is selected. LED (2) lights in the colour of the selected operating mode.
- Press the dimming mode button (1) longer than 1 second and hold the button pressed. LED (2) blinks. Light switches to the lowest brightness and becomes brighter slowly.
- When changing the operating mode to universal, the first action is to calibrate to the load. Continue holding the dimming mode button (1). Lighting of the lamp must be recognisable in the lowest dim position.
- Release the dimming mode button (1) as soon as the desired minimum brightness is reached. LED (2) lights, the operating mode and minimum brightness are set.
- Optionally change the minimum brightness again: press the dimming mode button (1) longer than 1 second. Light switches to the lowest brightness again and becomes brighter slowly.
- Save settings: press the dimming mode button (1) for less than 1 second or do not operate the button for at least 30 seconds. The LED (2) goes out.
Rotary dimmer LED with 2-way push switch
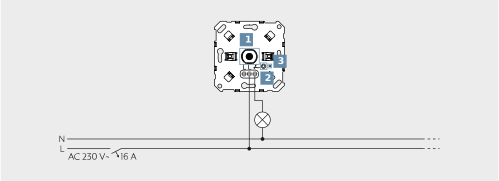
(1) Rotary axis |
(2) Prog. button |
(3) Status LED |
- Connect the rotary dimmer in accordance with the connection image.
- Place the rotary dimmer in an appliance box and fasten it with screws.
You can optionally retrofit with expanding claws. The rotary dimmer takes account of the different electronic properties of most LED lamps on the market. However, it is not possible to rule out that the desired results might not be achieved in individual cases.
Clampable conductor cross sections | |
|---|---|
| 1 x 0.5 ... 2.5 mm² |
2 x 0.5 ... 1.5 mm² | |
| 1 x 0.5 ... 2.5 mm² |
2 x 0.5 ... 1.5 mm² | |
| 1 x 0.5 ... 2.5 mm² |
2 x 0.5 ... 1.5 mm² | |
Set minimum brightness
Requirement: the rotary dimmer has been switched on with the rotary axis (1).
- Briefly press the Prog. button (2).
- The status LED (3) lights and the light is switched off.
- Long press the Prog. button (2) and hold it pressed.
- The status LED (3) blinks after approx. 4 seconds. The light switches to half brightness and slowly becomes less bright.
- Release the Prog. button (2) as soon as it reaches the desired brightness.
- The status LED (3) lights.
- Report the process as required. Long press the Prog. button (2) again.
- Briefly press the Prog. button (2) or wait for 30 seconds.
- The minimum brightness is stored and the process is ended. The status LED (3) goes out and the light blinks briefly.
Setting maximum brightness
Requirement: the rotary dimmer has been switched on with the rotary axis (1).
- Long press the Prog. button (2) and hold it pressed.
- The status LED (3) blinks after approx. 4 seconds. The light switches to maximum brightness and slowly gets less bright.
- Release the Prog. button (2) as soon as it reaches the desired brightness.
- The status LED (3) lights.
- Report the process as required. Long press the Prog. button (2) again.
- Briefly press the Prog. button (2) or wait for 30 seconds.
- The maximum brightness is saved and the process is ended. The status LED (3) goes out and the light blinks briefly.